
In today’s interconnected world, a secure Wi-Fi network is no longer a luxury, but a necessity. Protecting your personal information, online activities, and connected devices from cyber threats is paramount. This article provides a comprehensive guide on how to set up a secure Wi-Fi network at home, ensuring your digital life remains private and protected. We’ll cover essential steps, from choosing the right security protocol to creating a strong password, enabling you to confidently navigate the online world from the safety of your home.
Learning how to establish a secure home Wi-Fi network empowers you to safeguard your valuable data and online privacy. By following these practical steps, you can effectively mitigate the risks of unauthorized access and cyberattacks. This guide will delve into configuring your router’s security settings, including enabling a robust firewall and regularly updating its firmware, crucial aspects of maintaining a secure wireless network. Take control of your home network security and enjoy peace of mind knowing your digital world is well-protected.
Choosing a Strong Router Password
Your router password, also known as your Wi-Fi network’s passphrase, is the first line of defense against unauthorized access. A weak password can be easily cracked, leaving your network vulnerable.
Choose a password that is at least 12 characters long. A strong password incorporates a mix of uppercase and lowercase letters, numbers, and symbols. Avoid using easily guessable information such as your name, address, or birthdate.
Consider using a passphrase. A passphrase is a longer password composed of multiple words. A random string of words can be surprisingly strong and easier to remember than complex character combinations.
Enabling WPA3 Encryption
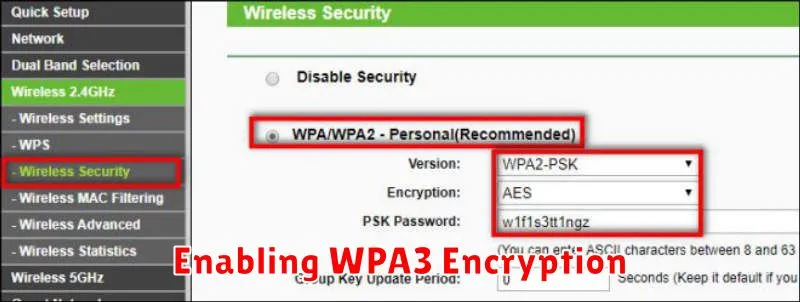
Wi-Fi Protected Access 3 (WPA3) is the latest security standard for wireless networks. It offers significantly improved security over its predecessor, WPA2. If your router and devices support WPA3, it’s highly recommended that you enable it.
To enable WPA3, you’ll typically need to access your router’s configuration settings. This is usually done by typing your router’s IP address into a web browser. Consult your router’s manual for specific instructions on accessing these settings.
Within the Wi-Fi security settings, look for the “Security Mode” or “Encryption” option. Select “WPA3-Personal”, “WPA3-SAE”, or a similar option indicating WPA3. If you see options like “WPA3/WPA2 Transitional Mode,” this allows older devices that only support WPA2 to still connect while newer devices can utilize WPA3. Choosing pure WPA3 provides the strongest security if all your devices are compatible.
After changing the security settings, save the changes and your Wi-Fi network will restart using WPA3 encryption. You may need to reconnect your devices to the network with the new password if you changed it at the same time.
Hiding Your Network SSID
Hiding your network SSID, or Service Set Identifier (the name of your Wi-Fi network), removes it from the list of available networks. While this adds a small layer of security by making your network less visible, it’s important to understand that this alone is not sufficient protection. A determined individual can still discover a hidden SSID with readily available tools.
To connect to a hidden network, you’ll need to manually enter the SSID, security type, and password on your devices. This can be slightly inconvenient, but it provides a minor obstacle for casual snooping.
It’s crucial to combine hiding your SSID with robust security measures such as WPA2 or WPA3 encryption and a strong password. Relying solely on a hidden SSID is not a secure practice.
Disabling WPS for Extra Safety
While convenient, Wi-Fi Protected Setup (WPS) can introduce a security vulnerability to your home network. It’s designed for easy setup, but this simplicity can be exploited. Disabling WPS adds an extra layer of protection against unauthorized access.
Most routers have a WPS button, often marked with a symbol of two circling arrows. You can typically disable WPS through your router’s web interface. Access this interface by typing your router’s IP address (often 192.168.1.1 or 192.168.0.1) into your web browser. Look for a WPS or Wi-Fi Protected Setup section within the settings. The exact steps may vary depending on your router’s make and model, but the option to disable it is usually clearly presented.
Updating Firmware Regularly
Firmware is the embedded software that controls your router and other network devices. Manufacturers frequently release updates that address security vulnerabilities and improve performance. Neglecting these updates can leave your network exposed to attacks.
Check your router manufacturer’s website or the router’s administration interface for instructions on how to update the firmware. Many modern routers support automatic updates, which is the most convenient and secure option. Enable this feature if available.
Regularly updating firmware is a critical step in maintaining a secure Wi-Fi network and protecting your data.
Creating Guest Networks for Visitors
A guest network provides internet access to visitors without compromising your main network’s security. It isolates your personal devices and data from your guests’ devices. It’s essential to enable this feature if your router supports it.
Access your router’s configuration page. Look for the “Guest Network” or similarly named setting. Enable the guest network and customize the network name (SSID) and password. Choose a strong password and never use the same password as your main Wi-Fi network.
Most routers allow you to customize guest network access. You can typically limit bandwidth and access to local network resources. This further enhances security.